I have always wanted to remotely update my IoT devices when they are in need of a software change. It is really a pain when I have to disassemble a dedicated device just because I need to update the software that is embedded in it. It has been so much of a pain for me I have gone as far as trying to make the device as dumb as possible and leave the smarts in a service located on a computer with an OS that supports remote access. Doing so seems to make the device just a remote I/O extension and not an actual Smart Device.
Continuous delivery takes the remote update one step further. If I have a source control repository that I commit some new code to, then my automated process should be smart enough to pick up that change, compile, test and deploy the new bits to it’s final destination. Wow wouldn’t that be cool!!!
In order to do this the device would need to be smart enough to support a remote update process. That means a device would have to be able to check for updates and automatically apply them. You could write your own remote update process and I have done this many times for desktop applications, but doing this on an embedded device is little more tricky. Sometimes it would require you to actually change the device firmware especially if the device doesn’t support dynamically loaded software. Basically the process to do so would require you to do the following:
- Detect if an update exists on some remotely accessible resource
- Download the update and unpack it
- Unload the current version of the software
- Load the new version of the software
- Start executing the new version
- Do this reliably without bricking the device
Fortunately the Spark.Io platform does all this for you so you don’t have to. The platform even supports an open source backend that will take source code, compile and deploy it. Now that makes it very possible to do continuous delivery for IoT devices. The rest of this blog post will explain how easy it is to set this up.
There are several things you will need to have in order to accomplish this:
- A Spark.io account and a device that is connected/registered with the account.
- A source control repository that is supported by your CI tool of choice (I am using GitHub)
- A build script that can either call restful APIs or can shell out to curl.exe (I am using psake with curl.exe).
- A CI tool that watches the source control for commits and kicks off the build process (I am using Team City on a Windows Azure VM).
You can see my source repository over at SparkContinuousDeliveryExample. Feel free to fork it and use it if you like. I used psake as my build scripting language of choice as it is supported by Team City and I find it very easy to understand.
Build script
My build script is called default.ps1.
properties {
  $deviceId = $env:SparkDeviceId
  $token = $env:SparkToken
  $base_dir = resolve-path .
  $curl = "$base_dir\lib\curl\curl.exe"
}

task default -depends Deploy

task Clean {
}

task Deploy {
  $url = "https://api.spark.io/v1/devices/" + $deviceId + "?access_token=" + $token
  exec {
     .$curl -X PUT -F file=@src\helloworld.ino "$url" -k

  }
} -depends Clean

task ? -Description "Helper to display task info" {
   Write-Documentation
The first thing you will notice is that the script takes 4 parameters that are defaulted but also can be overridden by Team City. The $deviceId represents the spark.io device Id and can be found in the spark.io build website after you have logged in and picked one of your devices. The $token is your spark.io access token and can be found in the spark.io build website after you have logged in and selected the settings menu option. You really only have 1 access token for an account but you could have multiple device id’s for an account. The other 2 parameters are really only for executing the curl.exe program that interfaces with the spark.io platform. Since the repository has the curl.exe you wont have to worry about installing it on your build server, but if you don’t like putting EXE’s in your repository you could override these parameters to launch the curl.exe that is installed on your build agent. The Deploy task is the only task in this build script that does anything. Basically it launches curl.exe passing in the device id, token and the file name to upload to the spark.io platform for compilation and deployment. In this case the program source file is helloworld.ino.
Testing the build script locally
You can test the psake build script on your local machine by first setting the environment variables for the $env:SparkDeviceId and $env:SparkToken.

Of course I didn’t include my real Device ID and Token in the example above so make sure you set them using your own Spark.io settings.
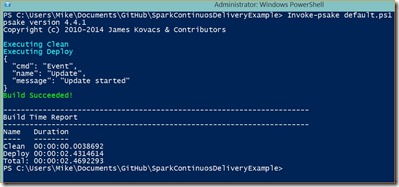
Make sure you are in the directory where you cloned the repository and use the Invoke-psake keyword to kick off the build.

Your code will be uploaded to spark.io, compiled and then deployed to your device. As you can see here the process completed successfully.
Setting up Team City:
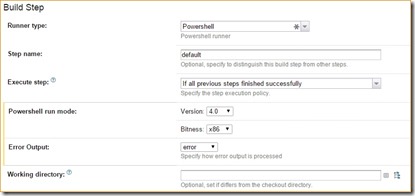
You will have to follow the instructions on the Team City web site on how to install Team City. It is very easy to do but I wont detail it here. I am also going to ignore the step of setting up Team City to connect to your Github repository. Assuming you have a project created in Team City and you have assigned the VCS root to the project you need a build step added to your project. You want to make sure you select Powershell as the runner type. See the other options I selected in the following screen snapshot:

Make sure you select Source Code as the script type and then type in the powershell script but make sure you replace the YourDeviceId and YourToken.

Here is the script so you can copy and paste it easier.
import-module .\lib\psake\psake.psm1
invoke-psake .\default.ps1 -properties @{"deviceId"="YourID";"token"="YourToken"}
if ($psake.build_success -eq $false) {exit 1} else { exit 0}
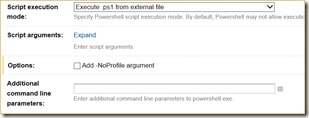
Here are the rest of the options to finish off the build step:

And that is all there is to it. You will want to add a Trigger to your build project so that it fires off a build when source is committed to the repository. Also make sure you have the VCS Root pointed to the “master” branch. Now whenever you commit changes to the master branch the build will pick it up and send it off to Spark.io for compile and deploy.
Limitations:
- Works on single file source solutions at this time.
- If a compile error exists the build does not fail (but the device does not update).
- If you edit the readme or any other non-source files and commit it then the device gets updated even though no source changes were made.
Enhancements:
- Get this working on a free hosted build platform
- Use a Raspberry PI as a build server
- Remove the dependency on curl.exe and use powershell to make the REST api calls
- Add in multi-file support
- If the Spark.io platform is down fail the build
- Make sure a compile error fails the build
Conclusion:
That is all I wanted to cover on this blog post. Of course there a million other ways you could set this up and I would also like to hear how others might do this. I have always dreaded pulling devices apart just to upgrade them and therefore I tended to not update them as frequently as I would like. I just need to get the hardware nailed down on some projects so that I can get them installed and hooked up to a build.


